Bolting Failure Analysis
Nuts and bolts are used everywhere. A bolting failure at home is usually only a minor nuisance. However, a similar failure at a nuclear power plant could be catastrophic, which is why bolt failure analysis of damaged bolted joints is so vital.
There are many reasons why bolting failures happen. In fact, they are often caused by a combination of factors.
According to Laurent Dastas, a Bolting Analysis Expert at Alstom Transport, there are four main root causes that explain bolt failure:
- The tightening operation was forgotten.
- The tightening tool was not accurate enough regarding tightening tolerances.
- An error in the fastener’s steel class.
- A failure in the tightening sequence.
In technical terms, there are two main types of bolting failure: static failures and fatigue – also called dynamic – failures. “The use of electronic keys, for the simultaneous recording of couples and angle-values during the tightening operation, allows securing on every assembly according to these four parameters,” says Laurent Dastas.
Static failures are generally easy to identify. For instance, they occur during overloading, after overtightening of the assembly, through an accident of external loads, or due to a ‘non-conforming product’.
Fatigue failure is often more complex, because the fatigue develops during the service cycle. There can be cracks in the material, such as in the fasteners, the threads of the bolt, or any component of the assembly. These cracks will increase and propagate on the normal section (stress section) of the screw before the total failure of the assembly.
“Actually, crack-related damage is the most dangerous failure in a bolted assembly,” says Zouhair Chaib, Senior Technical Expert at Nord-Lock.
In fatigue failures, the assembly can be correctly tightened at first. However, after external loading, the bolted joint starts to lose the force of the preloads due, for instance, to relaxation or self-loosening.
“When the loss of preload starts, it is not so easy to stop,” Chaib says. “When losing preload, both the alternated stress and the sliding between parts increase. When the sliding is repeated, more and more preload is lost.”
The alternated stress also continues to grow, eventually resulting in a fatigue crack. Under the external and cyclic loads, the fatigue crack will propagate. After some propagation of the screw, and when there is enough capacity against the fatigue load, total failure occurs. A fatigue crack can be initiated by corrosion or an impurity in the screw material, by cutting quality of threads or by an accidental load (impact).
When multiple screws are involved, the failure of one screw can overload other screws nearby. Overloading will then create a chain reaction of failures that happens very quickly, and it does not have to occur many times before the screws start to propagate.
“In terms of fatigue failures, one never knows when the fatigue, the cracks, and the total failure of the assembly will appear,” Chaib says. “Generally, the fatigue failure appears suddenly, and comes as a most unwelcome surprise.“
One way of finding out why a failure occurred is by using the Ischikawa (fishbone) diagram. This method is often used by Nord-Lock Technical Center when helping its customers.
“Once there is a failure, before replacing the existing assembly and changing parts, the customer needs to secure the environment,” Chaib says. “Pictures of all parts need to be taken and all parts must be marked with a number. It is also important not to touch the failure surfaces, contact surfaces or threads. We also need a description of the accident and the failure conditions to quickly identify the problem.”
The customer also needs to protect all the parts against corrosion during transportation to the Technical Center for analysis – this is to avoid any erroneous assumption that crack failures were due to corrosion, when they were not.
“By doing all this, the customer helps us to analyse the situation quickly and accurately, which enables us to give a prompt answer and solution,” Chaib says. “After doing this, changing the assembly is no longer critical. The customer can change any endangered parts to continue production, for example.”
Customers often have constraints and need to restart production as soon as possible. For this reason, it is very important to check and verify the assembly during transit. In the meantime, the customer and the expert analysts can work together to find the best and most accurate solution to replace the existing assembly.
At Nord-Lock Technical Center, all components are checked and photos taken of all damaged parts. In some cases, a 3D microscope is used to compare and control some factors. External partner laboratories can also be asked to perform additional analyses. Finally, the results are analysed and the overall picture is defined.
“In our laboratory, we can carry out vibration, torque and preload tests,” Chaib says. “We can also test the manner of the screw for instance – to be completely sure that the proposed solution will work correctly and safely.”
“At the Technical Center, we analyse several situations, identify the cause and propose a technical solution to the problem,” he continues. “We always take into account many other aspects, such as economical, practical and operational factors.”

The tensioner case:
Superbolt tensioners are used for their preload accuracy and because they allow the introduction of a high level of preload with a small torque.
One customer tested a multi-jackbolt from another manufacturer in a structure. After some time, a failure of the structure occurred and the customer asked Nord-Lock to investigate.
“We used the 3D microscope to analyse the failure,” Chaib says. “We understood that the main cause of the failure was fatigue, and that preload had accelerated it.“
The observed matting at the end of the jackbolts suggested that the preload was correctly introduced, but when the ‘course of jackbolts’ distance between the end of the jackbolt and the nut body was examined, there was a large difference in all the multi-jackbolts. One jackbolt had zero course. This was due to a self-loosening of the jackbolt.
“We also checked the capacity of the copy tensioner against the self-loosening, concluding that this factor was not considered by the copy tensioner,” Chaib says. “When we compared the copy with our tensioner, they both had the same thread diameter, the same material, and the same outside diameter, but some particularities of the multi-jackbolts were not respected.”
The tensioner had a good static capacity, but there was still the issue of self-loosening that caused the fatigue failure.
The clamp length case:
The customer used a standard bolted-joint solution, while having a damaged assembly. The customer replaced the assembly with new bolts, nuts, flat washers and spacers, took pictures and sent in the damaged parts. The customer also sent CAD, to provide information about the situation and the external load.
The customer had used spacers to increase the clamp length, and believed that this would resolve the problem. After re-starting the machine, the same failure occurred.
“After analysing the customer’s assembly, we understood that there was a fatigue failure,” Chaib says. “The assembly was highly preloaded. High preload is not dangerous, and is a good solution generally. We had to look for another reason for the failure and investigate further.”
We concluded that, in this situation, there was a high shear loading – a transversal loading. The customer needed to use the same clamp length as before, but increase the preload level by increasing the torque and the grade of the screw to be able to use a securing solution. For transversal load, the best solution was to increase the preload and maintain it using securing solutions.
“We suggested the customer use a Nord-Lock washer to protect his assembly against self-loosening,” Chaib says. “With our solution, he required a few modifications to his assembly: two Nord-Lock washers with a high grade bolt (10.9) and a suitable torque.”
The thread failure case:
The customer had lost half of its assembly, but there was no visible damage to the threads.
“We asked the customer for additional information about the estimated load, and about the condition of the assembly,” Chaib says. “The customer said it was subjected to shock load, but no fatigue load. “
“When we looked into the structure’s external profile, there was minor plastic deformation at the end of the threads. We also observed axial traces along the threads, and a non-constant outside diameter.”
The analysts identified a potential failure scenario: the outside diameter and the material properties were not resistant enough to support the hoop stress introduced by the thread angle and axial load. Under a full load, part one expanded (radial elongation) and, due to the fine pitch, part two slipped and separated from part one.
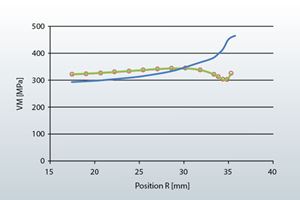
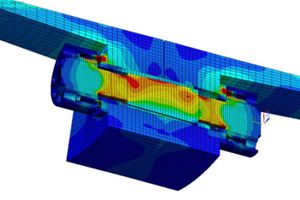
“To validate this scenario, we performed a FEM (Finite Element Method) calculation and compared the measured diameter to the FEM diameter (after axial loading) and the thread form given by FEM and reality,” Chaib says.
FEM results were so similar to reality that his scenario was accepted and a practical solution was proposed:
- Increase the outside diameter of the threaded part.
- Use coarse pitch.
- Use a stiff material (high Young’s modulus).
- Optimised form of part one.
The most common reasons for bolt failures:
1. Human error.
2. Material defects, e.g. an impurity in the material that initiates fatigue cracks.
3. Tools that are not correctly calibrated.
4. Design.
5. When the external load is underestimated or wrong assumptions are made.
6. Calculation, e.g. the torque or stress in the bolt is miscalculated.
Bolting failure analysis in brief:
The owner of the failed bolt assembly should do the following:
1. Secure the environment of the failed assembly.
2. Take pictures of all parts.
3. Number all components.
4. Protect the parts against corrosion.
5. Describe the accident and failure conditions carefully.
Nord-Lock Technical Center’s method:
1. Identify the problem.
2. Check all components and take photos of all damaged parts.
3. Use a 3D microscope to compare and control factors.
4. Use the Ishikawa diagram to figure out the possible failure factors.
5. Carry out relevant tests, e.g. vibration, torque and preload tests.
6. Ask partner laboratories to perform an additional analysis.
7. Analyse the results, define the main realistic scenario and present it to the customer.
8. Define practical solutions (economical, safe and easy to install).


